Best Cuisinart Bread Maker Recipes bring the joy of homemade baking right to your kitchen with ease. Whether you’re a beginner or an experienced baker, these recipes ensure perfect, fluffy, and delicious loaves every time. With your Cuisinart bread maker doing the hard work, you can enjoy fresh, warm bread without the hassle. Prepare to fill your home with the mouthwatering fragrance of homemade baked delights!

Top 1 Best Cuisinart Bread Maker Recipes You’ll Love
Equipment
- Cuisinart Bread Maker
- Measuring cups & spoons
- Mixing bowl (optional)
Ingredients
- 3 ¼ cups bread flour
- 1 ¼ cups warm water (110°F)
- 2 tbsp sugar
- 1 ½ tsp salt
- 2 tbsp butter (softened)
- 2 tsp active dry yeast
Instructions
- Step 1: Prepare the Ingredients– Measure and prepare all ingredients before starting.– Ensure the water is warm (but not overly hot) to activate the yeast effectively.
- Step 2: Load the Bread Maker– Pour warm water into the bread pan, followed by sugar and salt.– Add bread flour and butter.– Make a small well in the flour and add the yeast (do not let it touch the water).
- Step 3: Select the Baking Program– Place the bread pan into the Cuisinart Bread Maker and close the lid.– Select the Basic White Bread setting.– Choose your preferred crust level (light, medium, or dark).
- Step 4: Bake & Cool the Bread– Press Start and let the bread maker do the work!– After baking, carefully take the bread out of the pan and let it cool on a wire rack before cutting.
Notes
- You can substitute bread flour with all-purpose flour, but the texture may vary.
- For a healthier version, replace sugar with honey or maple syrup.
- Experiment with seeds, nuts, or herbs for added flavor.
Table of Contents

Introduction for Cuisinart Bread Maker Recipes
Nothing compares to the delightful scent of freshly baked bread wafting through your home. With a Cuisinart Bread Maker, making homemade bread is easier than ever, allowing you to enjoy bakery-quality loaves with minimal effort. Whether you’re a beginner or an experienced baker, this versatile appliance offers a hassle-free way to create delicious bread right in your kitchen.
Cuisinart bread makers come equipped with multiple settings that let you bake a variety of bread types, from classic white and whole wheat to gluten-free and artisan-style loaves. The convenience of a programmable bread machine means you can wake up to the smell of fresh bread every morning or have a warm loaf ready just in time for dinner. Additionally, Cuisinart bread makers allow for customization—letting you choose crust darkness, loaf size, and even mix in ingredients like nuts, seeds, or dried fruit.
For those who love healthy eating, homemade bread eliminates preservatives and additives found in store-bought loaves, giving you full control over what goes into your bread. Plus, with rising food costs, using a Cuisinart Bread Maker can be a cost-effective way to enjoy fresh, high-quality bread at home.
In this article, we’ll explore some of the best Cuisinart Bread Maker recipes that will help you make everything from classic sandwich bread to specialty loaves. These recipes are designed to work seamlessly with your Cuisinart bread machine, ensuring perfect results every time. Whether you’re craving something sweet, savory, or nutritious, you’ll find a recipe to satisfy your taste buds.
If you’re ready to transform your baking experience and unlock the full potential of your Cuisinart Bread Maker, keep reading to discover delicious recipes that will take your homemade bread to the next level!
Ingredients & Equipment
When it comes to baking homemade bread, having the right ingredients and equipment is just as important as the recipe itself. Whether you’re a seasoned baker or just starting out, using a Cuisinart Bread Maker can simplify the process and ensure consistent, delicious results. In this guide, we’ll dive deep into the essential tools and ingredients you need to make the perfect loaf of bread using your Cuisinart Bread Maker.
Essential Equipment for Making Bread in a Cuisinart Bread Maker
Using the right tools ensures accuracy and precision, which are crucial in baking. Below is a list of the essential equipment you’ll need:
1. Cuisinart Bread Maker
The Cuisinart Bread Maker is the heart of the operation. This automatic bread machine allows you to mix, knead, rise, and bake all in one device. Depending on the model, you can choose different crust shades (light, medium, or dark) and loaf sizes (1 lb, 1.5 lbs, or 2 lbs). The built-in timer and pre-programmed settings make it user-friendly for all skill levels.
2. Measuring Cups & Spoons
Precision is key in baking. Using accurate measuring cups and spoons ensures the right balance of flour, water, yeast, and other ingredients. Even slight miscalculations can affect the texture, rise, and taste of the bread. Opt for stainless steel or BPA-free plastic measuring tools for durability.
3. Mixing Bowl (Optional)
While the Cuisinart Bread Maker does all the mixing and kneading for you, a mixing bowl can be useful for pre-mixing ingredients, especially if you want to ensure even distribution of sugar, salt, and yeast before adding them to the bread pan. A glass or stainless-steel bowl works best.
Essential Ingredients for Cuisinart Bread Maker Recipes
The quality and combination of ingredients are the foundation of a great homemade loaf. Below is a detailed breakdown of the key ingredients used in a classic bread recipe for the Cuisinart Bread Maker.
1. Bread Flour (3 1/4 Cups)
Bread flour is the best option for making bread in a bread machine because it contains a higher protein content (typically 12-14%) than all-purpose flour. This higher protein level helps create strong gluten development, which gives the bread its structure and chewy texture. Using all-purpose flour may result in a softer, less structured loaf, so it’s best to stick with bread flour for optimal results.
2. Warm Water (1 1/4 Cups at 110°F)
The temperature of the water is essential for activating the yeast effectively. For this recipe, warm water at 110°F is recommended. If the water is too hot, it can kill the yeast; if it’s too cold, the yeast won’t activate properly. Using a kitchen thermometer ensures accuracy.
3. Sugar (2 Tbsp)
Sugar not only adds a hint of sweetness but also serves as food for the yeast. It helps with the fermentation process, leading to better rise and a more flavorful loaf. You can substitute sugar with honey, maple syrup, or agave nectar for a more natural alternative.
4. Salt (1 1/2 Tsp)
Salt is essential in bread-making as it enhances flavor and regulates yeast activity. Without salt, the bread could rise too quickly and collapse, leading to an unbalanced texture. Using sea salt or kosher salt is recommended over table salt because they contain fewer additives.
5. Butter (2 Tbsp, Softened)
Butter enriches the bread, making it softer and adding a slight richness to the flavor. It also helps with the browning of the crust. For a dairy-free alternative, you can use olive oil, coconut oil, or vegan butter. Make sure the butter is softened before adding it to the machine for even distribution.
6. Active Dry Yeast (2 Tsp)
Yeast is what makes the bread rise by producing carbon dioxide during fermentation. Active dry yeast needs to be proofed (activated in warm water) before mixing it with the other ingredients. However, if using instant yeast or bread machine yeast, you can add it directly to the dry ingredients without proofing.
Why These Ingredients and Equipment Matter
Each ingredient and piece of equipment in this list plays a crucial role in the bread-making process:
- The Cuisinart Bread Maker automates the kneading, rising, and baking process, making it effortless for beginners and experts alike.
- Bread flour ensures a strong gluten structure for the perfect chewy texture.
- Warm water at the right temperature activates the yeast for proper fermentation.
- Sugar feeds the yeast, improving the rise and adding a touch of sweetness.
- Salt balances flavors and controls yeast activity.
- Butter enhances the richness and texture of the bread.
- Yeast is the powerhouse behind the dough’s rise and airy crumb structure.
By using the right equipment and high-quality ingredients, you can create bakery-style bread from the comfort of your home with your Cuisinart Bread Maker. Whether you’re baking classic white bread, whole wheat, or experimenting with specialty loaves, having these essentials will set you up for success.
If you’re ready to bake, simply load the ingredients into your Cuisinart Bread Maker in the correct order, select the appropriate setting, and enjoy fresh, homemade bread with minimal effort.
Step-by-Step Instructions
If you’re looking to make delicious homemade bread with your Cuisinart Bread Maker, you’ve come to the right place. This step-by-step guide will ensure your bread turns out soft, fluffy, and flavorful every time. Follow these carefully detailed instructions to achieve the best results.
Step 1: Prepare the Ingredients
Before you begin, make sure all your ingredients are measured and ready to go. This preparation step is crucial for achieving a perfect loaf.
- Ensure the water is warm but not hot. The ideal temperature should be around 110°F (43°C) to properly activate the yeast. If the water is too hot, it can kill the yeast, and if it’s too cold, the yeast won’t activate, leading to dense bread.
- Have all dry and wet ingredients organized on your kitchen counter for easy access. This will help speed up the process and reduce mistakes.
Step 2: Load the Bread Maker
Once your ingredients are ready, it’s time to load them into your Cuisinart Bread Maker in the correct order. The sequence of adding ingredients is important to ensure proper mixing and rising.
- Add the warm water to the bread pan first. This provides the necessary moisture for the dough.
- Add sugar and salt to the water. Sugar helps feed the yeast, while salt enhances the bread’s flavor.
- Add bread flour carefully over the water. This creates a buffer between the yeast and liquid, preventing premature activation.
- Place the butter into the bread pan. This adds richness and a soft texture to the bread.
- Make a small well in the flour using your finger or a spoon. Be careful not to reach the water.
- Add the yeast into the well. This step is crucial because if yeast comes in direct contact with water before mixing, it may activate too soon and affect the dough’s texture.
Once everything is added in the correct order, your bread maker is ready to start the magic!
Step 3: Select the Baking Program
Now that your ingredients are properly loaded into the bread pan, it’s time to set up the Cuisinart Bread Maker for baking.
- Place the bread pan securely inside the machine and close the lid.
- Select the “Basic White Bread” setting from the menu. This is the most commonly used program for a standard loaf.
- Choose your preferred crust level—light, medium, or dark. If you’re unsure, medium crust is a great default choice as it provides a balanced texture.
- Start the bread-making process by pressing the “Start” button. The machine will now begin mixing, kneading, rising, and baking automatically.
At this point, your bread maker will take care of everything. The total process usually takes between 3 to 4 hours, depending on the selected settings.
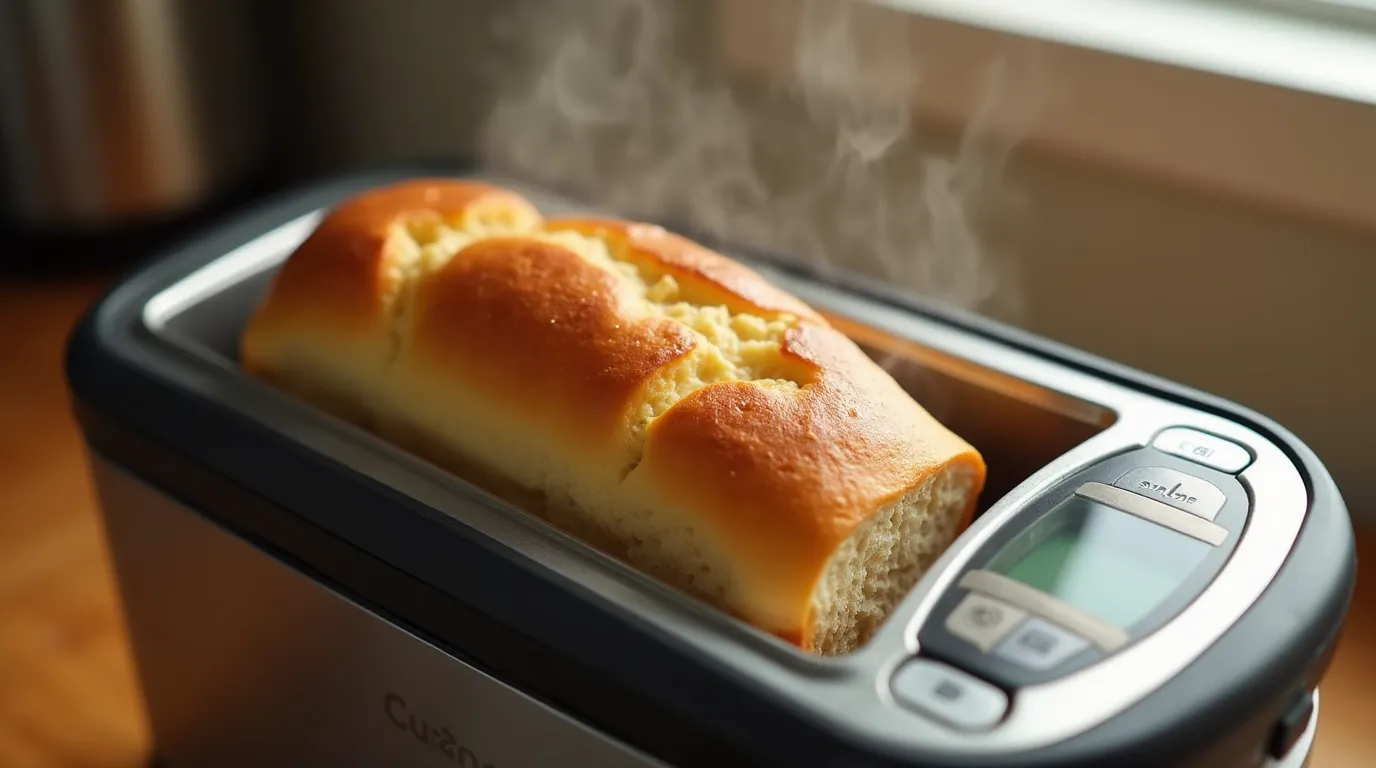
Step 4: Bake & Cool the Bread
Once the baking cycle is complete, it’s important to follow the proper steps for cooling and handling your freshly baked bread.
- Carefully remove the bread pan from the bread maker using oven mitts, as it will be extremely hot.
- Turn the pan upside down and gently shake it to release the bread onto a cooling rack. If the bread sticks, allow it to sit for a few minutes before trying again.
- Let the bread cool on a wire rack for at least 15-30 minutes before slicing. This step is essential because cutting the bread too soon can cause it to become gummy inside.
- Slice and enjoy! Once cooled, use a sharp bread knife to cut even slices. Serve fresh or store in an airtight container to maintain freshness.
Final Tips for the Best Results
- For the best rise and flavor, always use fresh yeast. Expired yeast may result in dense or flat bread.
- Measure flour accurately using the scoop-and-level method to prevent adding too much, which can make the bread dry.
- Do not open the lid while the bread is rising or baking, as this can affect the final texture.
- Experiment with settings—if your first loaf isn’t perfect, adjust the crust level or flour ratio slightly for future attempts.
By following these step-by-step instructions, your Cuisinart Bread Maker will produce bakery-quality bread that’s soft, fluffy, and delicious every time. Happy baking!
Nutrition Facts & Tips
When it comes to homemade bread, Cuisinart bread maker recipes offer a perfect blend of convenience and nutrition. Understanding the nutritional breakdown per slice can help you make informed dietary choices while enjoying fresh, homemade bread. Below, we provide an in-depth analysis of the nutrition facts and expert tips to enhance the health benefits of your homemade bread.
Nutrition Facts Breakdown (Per Slice)
Calories: 150
Each slice contains approximately 150 calories, making it a moderate-calorie option. Compared to store-bought bread, which often has added preservatives and artificial ingredients, homemade bread allows better control over calorie intake. If you’re monitoring your caloric consumption, consider adjusting portion sizes or experimenting with lower-calorie flour alternatives.
Carbohydrates: 28g
Bread is naturally rich in carbohydrates, providing 28g per slice. Carbs are essential for energy, fueling the body for daily activities. Opting for whole grain or multigrain flour can help maintain a steady release of energy while reducing blood sugar spikes.
Protein: 4g
With 4g of protein per slice, this bread contributes to muscle maintenance and overall body function. While it’s not as protein-rich as some specialty breads, you can increase the protein content by incorporating seeds like chia or flaxseeds into the dough.
Fat: 2.5g
A relatively low fat content makes this bread a heart-healthy option. Most of the fat comes from natural ingredients like flour and minor additions such as oil or butter. Using healthier fat sources, such as olive oil or avocado oil, can enhance the bread’s nutritional profile.
Fiber: 1g
Dietary fiber is crucial for digestion and gut health. With only 1g of fiber per slice, this bread may not be the most fiber-rich choice. However, adding whole wheat flour, oats, or fiber-rich seeds can significantly boost the fiber content, aiding digestion and promoting a feeling of fullness.
Expert Tips for Optimizing Nutrition in Your Cuisinart Bread Maker Recipes
- Use Whole Grains for Better Health
- Swap refined flour for whole wheat, oat, or spelt flour to increase fiber and nutrient content.
- Whole grains provide essential vitamins and minerals that support overall health.
- Enhance Protein with Nutritious Additions
- Add nuts, seeds, or Greek yogurt to the dough for an extra protein boost.
- Consider using a mix of almond flour and regular flour to enhance the protein profile.
- Reduce Sugar and Sodium for a Healthier Loaf
- Many bread recipes include added sugar and salt; reducing these can lower the risk of high blood pressure and diabetes.
- Use natural sweeteners like honey or applesauce instead of refined sugar.
- Incorporate Healthy Fats
- Replace butter with healthier fats like olive oil, coconut oil, or avocado oil for better heart health.
- Adding flaxseeds or chia seeds can introduce omega-3 fatty acids, which support brain function and reduce inflammation.
- Boost Fiber Content for Better Digestion
- Adding bran, flaxseeds, or psyllium husk can help improve fiber intake.
- Fiber aids digestion and can help with weight management by promoting fullness.
- Consider Gluten-Free or Low-Carb Variations
- For those with gluten sensitivities, experimenting with almond flour, coconut flour, or gluten-free blends can be a great alternative.
- Low-carb alternatives like cauliflower flour or protein-rich flour blends can cater to ketogenic or diabetic diets.
- Store Bread Properly to Maintain Freshness
- Keep homemade bread in an airtight container to prevent it from drying out or molding.
- Refrigeration can extend shelf life, but for the best taste, store at room temperature for up to 3 days and freeze extra slices.
Conclusion
Cuisinart bread maker recipes provide a delicious and nutritious homemade bread option. With 150 calories, 28g carbs, 4g protein, 2.5g fat, and 1g fiber per slice, this bread is a well-balanced choice for everyday consumption. By making small ingredient adjustments, such as using whole grains, reducing sugar, and adding protein-rich seeds, you can turn your homemade bread into a powerhouse of nutrition. Whether you’re aiming for a healthier diet or simply love the taste of fresh bread, these tips will help you make the most of your Cuisinart bread maker recipes.

Recipe Variations
Exploring the versatility of the Cuisinart Bread Maker opens up a world of delightful bread variations that cater to diverse palates. Beyond the standard loaves, this appliance allows home bakers to experiment with a plethora of flavors and textures, enhancing the homemade bread experience. In this article, we delve into several innovative bread variations that can be crafted using the Cuisinart Bread Maker, each offering a unique taste adventure.
1. Herb and Cheese Bread
Infusing herbs and cheese into your bread introduces a savory depth that’s perfect for accompanying meals or enjoying on its own. A harmonious blend of aromatic herbs like rosemary, thyme, and basil, combined with sharp cheddar or parmesan, creates a loaf that’s both fragrant and flavorful. This variation not only tantalizes the taste buds but also adds a gourmet touch to your bread repertoire.
2. Cinnamon Raisin Swirl Bread
For those with a penchant for sweet treats, the cinnamon raisin swirl bread offers a delightful option. The sweetness of raisins paired with the warm spice of cinnamon creates a comforting and indulgent loaf. This bread is ideal for breakfast or as a snack, providing a sweet yet wholesome experience.
3. Sun-Dried Tomato and Olive Bread
Elevate your bread-making with a Mediterranean twist by incorporating sun-dried tomatoes and olives. This combination imparts a rich, savory flavor profile, with the tanginess of sun-dried tomatoes complementing the briny depth of olives. The result is a robust loaf that pairs excellently with cheeses and charcuterie.
4. Multigrain Seeded Bread
For health-conscious bakers, a multigrain seeded bread offers a nutritious and hearty option. By blending various grains such as oats, barley, and millet with seeds like flax, sunflower, and chia, this bread provides a rich source of fiber and essential nutrients. The texture is delightfully dense, with a nutty flavor that satisfies both taste and health considerations.
5. Chocolate Chip Brioche
Indulge in a touch of luxury with a chocolate chip brioche. This rich, buttery bread studded with chocolate chips offers a decadent treat that’s perfect for special occasions or a sumptuous breakfast. The soft, tender crumb combined with the sweetness of chocolate makes this variation a favorite among those with a sweet tooth.
6. Jalapeño Cheddar Bread
For a spicy kick, jalapeño cheddar bread brings together the heat of jalapeños with the creamy sharpness of cheddar cheese. This bold combination results in a flavorful loaf that’s perfect for those who enjoy a bit of spice. It’s an excellent accompaniment to chili or can be used to elevate a simple sandwich.
7. Pumpkin Spice Bread
Embrace the flavors of fall with a pumpkin spice bread. Incorporating pumpkin puree and a blend of spices like cinnamon, nutmeg, and cloves, this bread offers a moist, flavorful experience reminiscent of pumpkin pie. It’s a seasonal favorite that brings warmth and comfort with every slice.
8. Garlic and Herb Focaccia
Recreate the classic Italian flatbread by preparing a garlic and herb focaccia in your Cuisinart Bread Maker. Infused with olive oil, minced garlic, and a medley of herbs, this bread boasts a soft interior with a slightly crispy exterior. It’s perfect as an appetizer or alongside pasta dishes.
9. Lemon Poppy Seed Bread
For a zesty and refreshing option, lemon poppy seed bread combines the bright flavor of lemon with the subtle crunch of poppy seeds. This light and airy loaf is ideal for spring and summer, offering a pleasant citrusy aroma and taste.
10. Honey Oat Bread
Combining the natural sweetness of honey with the wholesome texture of oats, honey oat bread provides a comforting and hearty loaf. The addition of oats adds a slight chewiness, while honey imparts a gentle sweetness, making it perfect for sandwiches or toasted with a pat of butter.
Each of these variations showcases the adaptability of the Cuisinart Bread Maker, allowing bakers to explore and create a wide array of breads to suit different tastes and occasions. By experimenting with various ingredients and flavors, you can transform simple bread recipes into culinary delights that impress and satisfy.
Frequently Asked Questions
If you’re considering investing in a Cuisinart bread maker, you might have several questions before making your decision. Here, we answer the most frequently asked questions in detail to help you understand whether a bread maker is the right choice for you.
Is the Cuisinart Bread Maker Worth It?
The Cuisinart bread maker is a high-quality appliance that offers convenience, consistency, and control over your bread-making process. Whether it’s worth it depends on your needs and expectations.
Reasons Why the Cuisinart Bread Maker is Worth It:
- Convenience: Making fresh bread at home without kneading or monitoring is a major advantage. Simply add the ingredients, set the machine, and let it do the work.
- Customization: Unlike store-bought bread, you can control the ingredients, ensuring no preservatives, artificial additives, or excessive sodium.
- Variety: The Cuisinart bread maker supports different types of bread, including gluten-free, whole wheat, and artisan-style loaves.
- Consistent Results: Baking in a traditional oven can be unpredictable, but a bread maker provides uniform baking and texture.
- Cost Savings Over Time: While the initial investment might seem high, it can save money in the long run if you bake frequently.
Who Might Not Find It Worth It?
- If you rarely eat bread, the machine may take up unnecessary space in your kitchen.
- Some people enjoy the hands-on process of kneading and shaping dough, which a bread maker eliminates.
- The cost of electricity for frequent use might be a concern for some households.
Overall, the Cuisinart bread maker is a valuable appliance for those who love fresh bread with minimal effort and want control over ingredients.
Is It Cheaper to Buy Bread or Make It in a Bread Machine?
The cost of making bread at home versus buying it depends on several factors, including ingredient prices, electricity costs, and how often you bake.
Cost Breakdown:
- Ingredients: A basic homemade loaf costs around $1.50–$2.00, including flour, yeast, water, sugar, and oil. Specialty loaves, such as whole wheat or gluten-free, may cost slightly more.
- Electricity: Running a bread maker for a full cycle consumes about 0.3–0.5 kWh, translating to roughly $0.05–$0.10 per loaf.
- Bread Machine Cost: If a Cuisinart bread maker costs $100–$150 and lasts several years, the initial investment spreads out over time.
Comparing to Store-Bought Bread:
- Cheap Store Bread ($1–$3 per loaf): Store-bought bread can be inexpensive, but lower-quality options often contain preservatives and artificial ingredients.
- Premium Artisan Bread ($4–$8 per loaf): If you buy high-quality bread, making it at home becomes significantly cheaper.
Final Verdict:
If you consume bread regularly, making it in a bread machine can save money in the long run. Additionally, homemade bread is fresher, healthier, and free from unnecessary additives.
What Is the Disadvantage of a Bread Maker?
While bread makers offer many advantages, they also have some downsides.
1. Limited Loaf Shapes and Sizes
Most bread machines bake in a standard rectangular or square shape. If you prefer round or oval-shaped artisan bread, you’ll need to use a traditional oven.
2. Space Consumption
A bread maker can take up significant counter or storage space, which might be an issue for those with small kitchens.
3. Limited Crust and Texture Control
While modern bread makers offer crust color settings, they cannot always replicate the crisp, chewy texture of artisan-style bread baked in a traditional oven.
4. Initial Cost
A high-quality bread maker like Cuisinart ranges from $100 to $150. If you don’t bake often, the cost may outweigh the benefits.
5. Learning Curve
Getting the perfect loaf requires experimenting with ingredient ratios and machine settings, which might be frustrating for beginners.
Despite these disadvantages, many people find that the benefits of a bread maker outweigh the drawbacks, especially if they enjoy fresh homemade bread regularly.
How Long Does It Take to Cook Bread in a Cuisinart Bread Maker?
The time required to bake bread in a Cuisinart bread maker depends on the type of bread and the selected settings.
General Baking Times:
- Basic White Bread: 3 to 4 hours
- Whole Wheat Bread: 3.5 to 4.5 hours
- Gluten-Free Bread: 2.5 to 3.5 hours
- Quick Bread: 1.5 to 2 hours
- Dough-Only Cycle: 1 to 2 hours (for making pizza dough or rolls)
Factors That Affect Baking Time:
- Loaf Size: Larger loaves take longer to bake.
- Yeast Type: Some recipes require longer rising times.
- Crust Setting: A darker crust may add extra baking time.
Most Cuisinart bread makers have a delay timer, allowing you to schedule baking so fresh bread is ready when needed.
Why Are Bread Makers No Longer Popular?
While bread makers were highly popular in the 1990s and early 2000s, their demand has declined for several reasons:
1. Changing Lifestyles
People now have busier schedules and often buy ready-made bread for convenience rather than dedicating time to homemade baking.
2. Increased Availability of Artisan Bread
Supermarkets and bakeries offer a variety of high-quality bread options, reducing the need for homemade alternatives.
3. Kitchen Space Constraints
Many people prefer multi-functional appliances instead of single-purpose devices like bread makers.
4. Perception of Complexity
Some users find bread makers complicated or intimidating, especially if early attempts don’t yield perfect results.
Despite this decline in popularity, bread makers remain valuable for health-conscious individuals and home bakers who prioritize fresh, preservative-free bread.
Why Use a Bread Maker Instead of an Oven?
Using a bread maker offers several advantages over baking bread in a traditional oven.
1. Hands-Free Process
With a bread maker, there’s no need to knead, proof, or monitor the dough—everything is automated.
2. Consistency and Precision
Bread machines provide uniform temperature control, ensuring consistent results every time.
3. Energy Efficiency
A bread maker uses less energy than a full-sized oven, making it more cost-effective for frequent bakers.
4. Less Mess
Traditional baking requires multiple bowls, measuring cups, and baking trays. A bread maker simplifies cleanup since everything happens in one container.
5. Programmable Features
Modern bread makers offer customization options, such as gluten-free settings, crust preferences, and delay timers.
While oven baking allows for greater creativity with shaping and crust texture, a bread maker is the ultimate convenience tool for effortless homemade bread.
Final Thoughts
A Cuisinart bread maker is an excellent investment for anyone who loves homemade bread with minimal effort. While it may not be for everyone, its cost-effectiveness, health benefits, and convenience make it a worthwhile addition to many kitchens. If you value fresh, preservative-free bread and want to save time, a bread maker is an excellent choice.

Top 1 Recettes Johnny Cake: Easy & Delicious Island Treat
Recettes Johnny Cake: This golden, fluffy bread, a Caribbean favorite, is loved for its simplicity and irresistible taste. Easy to make, it can be enjoyed sweet or savory, as a … Read more
Top 1 Best Cuisinart Bread Maker Recipes You’ll Love
Best Cuisinart Bread Maker Recipes bring the joy of homemade baking right to your kitchen with ease. Whether you’re a beginner or an experienced baker, these recipes ensure perfect, fluffy, … Read more
top 1 the best Grandma’s German chocolate cake recipe
the best Grandma’s German chocolate cake recipe and it’s more delightful than you could ever imagine. This timeless dessert is a masterpiece of rich, moist chocolate cake paired with a … Read more